
מדריכים
RFID

מאי
RFID היא טכנולוגיה לזיהוי על ידי תדר רדיו קצר. שני השחקנים העיקריים הם קורא (Reader) ותג זיהוי (tag).
תפקיד הקורא הוא לשלוח גלי רדיו לטווח קצר בדרך כלל 13.56MHz ולקבל בחזרה מידע ששמור בתג הזיהוי. מה שיפה זה שרק הקורא צריך מקור מתח, התג במידה והוא פסיבי משדר את המידע בעזרת האנרגיה הנשלחת מהקורא.
לכל תג יש זכרון של לפחות 1KB ובתוכו החלק החשוב ביותר הוא ה-ID שהוא מה שמזהה את התג מתגים אחרים.
RFID נמצאית בשימוש בעיקר במערכות של בקרת כניסה ושל לוגיסטיקה, בבקרת כניסה הקורא הוא נייח ומחובר למחשב או בקר ששמורים בו נתונים. הקורא סורק את התגים שבקרבתו ואז שולח את המידע למחשב לאימות הנתונים, במידה ומספר הזיהוי קיים במערכת הוא מבצע פעולה כלשהי כמו פתיחת דלת או רישום שעה.
כמובן יש צורך מראש להכניס לזכרון את מספרי התגים המאושרים.
בלוגיסטיקה הקורא הוא בדרך כלל נייד ומקרבים אותו לדברי טובין עליהם יש תג זיהוי. בחנויות בגדים וחניונים גם משתמשים בטכנולוגיה הזאת שתופסת תאוצה ומחליפה את הברקוד הישן והטוב.
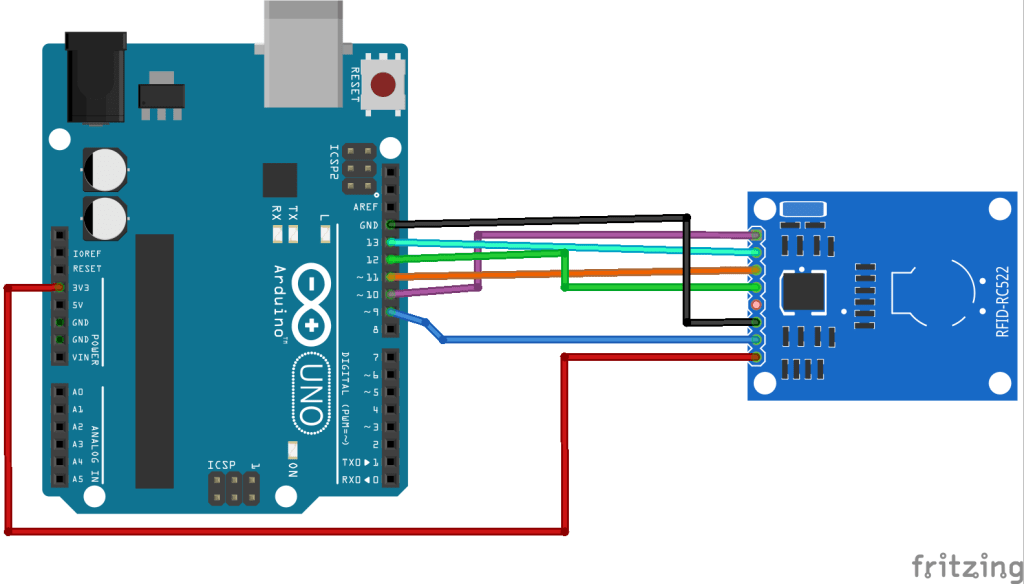
לענייננו בואו נפעיל קורא כרטיסים עם ארדואינו. הקורא RC522 נחשב לפשוט מאוד ומתקשר באמצעות SPI, מתח ההפעלה שלו הוא 3.3V.
| Pin | Wiring to Arduino Uno |
| SDA | Digital 10 |
| SCK | Digital 13 |
| MOSI | Digital 11 |
| MISO | Digital 12 |
| IRQ | unconnected |
| GND | GND |
| RST | Digital 9 |
| 3.3V | 3.3V |
הספריה העיקרית להפעלה שלו היא מעולה אבל הדוגמאות קצת מתקדמות מדי. בואו נתחיל עם דוגמה פשוטה יותר:
/*
 *
 * All the resources for this project: http://randomnerdtutorials.com/
 * Modified by Rui Santos
 *
 * Created by FILIPEFLOP
 *
 */

#include <SPI.h>
#include <MFRC522.h>

#define SS_PIN 10
#define RST_PIN 9
MFRC522 mfrc522(SS_PIN, RST_PIN); // Create MFRC522 instance.

void setup()
{
 Serial.begin(9600); // Initiate a serial communication
 SPI.begin(); // Initiate SPI bus
 mfrc522.PCD_Init(); // Initiate MFRC522
 Serial.println("Approximate your card to the reader...");
 Serial.println();

}
void loop()
{
 // Look for new cards
 if ( ! mfrc522.PICC_IsNewCardPresent())
 {
 return;
 }
 // Select one of the cards
 if ( ! mfrc522.PICC_ReadCardSerial())
 {
 return;
 }
 //Show UID on serial monitor
 Serial.print("UID tag :");
 String content= "";
 byte letter;
 for (byte i = 0; i < mfrc522.uid.size; i++)
 {
 Serial.print(mfrc522.uid.uidByte[i] < 0x10 ? " 0" : " ");
 Serial.print(mfrc522.uid.uidByte[i], HEX);
 content.concat(String(mfrc522.uid.uidByte[i] < 0x10 ? " 0" : " "));
 content.concat(String(mfrc522.uid.uidByte[i], HEX));
 }
 Serial.println();
 Serial.print("Message : ");
 content.toUpperCase();
 if (content.substring(1) == "BD 31 15 2B") //change here the UID of the card/cards that you want to give access
 {
 Serial.println("Authorized access");
 Serial.println();
 delay(3000);
 }

 else {
 Serial.println(" Access denied");
 delay(3000);
 }
}
עכשיו פותחים חלון תקשורת טורית ובודקים מה המספר הייחודי של התג, ואז מחליפים אותו במקום BD 31 15 2B. ברגע שאנחנו יודעים את מספר התג אפשר לעשות מה שרוצים – להדליק נורות להשמיע זמזום וגם לפתוח מנעול חשמלי.
#include <SPI.h>
#include <MFRC522.h>

#define SS_PIN 10
#define RST_PIN 9
MFRC522 mfrc522(SS_PIN, RST_PIN); // Create MFRC522 instance.

void setup()
{
 Serial.begin(9600); // Initiate a serial communication
 SPI.begin(); // Initiate SPI bus
 mfrc522.PCD_Init(); // Initiate MFRC522
 Serial.println("Approximate your card to the reader...");
 Serial.println();
 pinMode(2, OUTPUT);
 pinMode(3, OUTPUT);
 pinMode(4, OUTPUT);

}
void loop()
{
 // Look for new cards
 if ( ! mfrc522.PICC_IsNewCardPresent())
 {
 return;
 }
 // Select one of the cards
 if ( ! mfrc522.PICC_ReadCardSerial())
 {
 return;
 }
 //Show UID on serial monitor
 Serial.print("UID tag :");
 String content= "";
 byte letter;
 for (byte i = 0; i < mfrc522.uid.size; i++)
 {
 Serial.print(mfrc522.uid.uidByte[i] < 0x10 ? " 0" : " ");
 Serial.print(mfrc522.uid.uidByte[i], HEX);
 content.concat(String(mfrc522.uid.uidByte[i] < 0x10 ? " 0" : " "));
 content.concat(String(mfrc522.uid.uidByte[i], HEX));
 }
 Serial.println();
 Serial.print("Message : ");
 content.toUpperCase();
 if (content.substring(1) == "CC 54 62 A3") //change here the UID of the card/cards that you want to give access
 {
 Serial.println("Authorized access");
 Serial.println();

digitalWrite(3, HIGH);
 tone(4, 300, 500);
 delay(100);
 tone(4, 3000, 500);
 delay(2000);
 digitalWrite(3, LOW);
 }

 else {
 Serial.println(" Access denied");
 digitalWrite(2, HIGH);
 tone(4, 3000, 500);
 delay(100);
 tone(4, 300, 500);
 delay(2000);
 digitalWrite(2, LOW);

 }
}
צריך להגיד הרבה תודה לחברינו ריו סנטוס שמסביר פה בצורה מפורטת את החיבורים והקוד.